

What is Rubber Molding and How Does It Work?
I used to think rubber molding was simple. Then I saw how many small choices could affect cost, fit, and life. That is where problems start.
Rubber molding is a shaping process that uses heat, pressure, and a mold to turn raw rubber into a finished part with a fixed shape and useful performance.
I often tell people that rubber molding looks easy from the outside. I have seen teams save time and money when they understand it well. I have also seen them lose both when they treat it like a basic forming step. That gap is why I keep going deeper into the process.
What Are the Main Types of Rubber Molding Processes?
I have worked with many molded parts, and I have learned that the process choice shapes the final result. Some parts need speed. Some need detail. Some need strength. I choose the process based on the part’s use, the material, and the target cost.
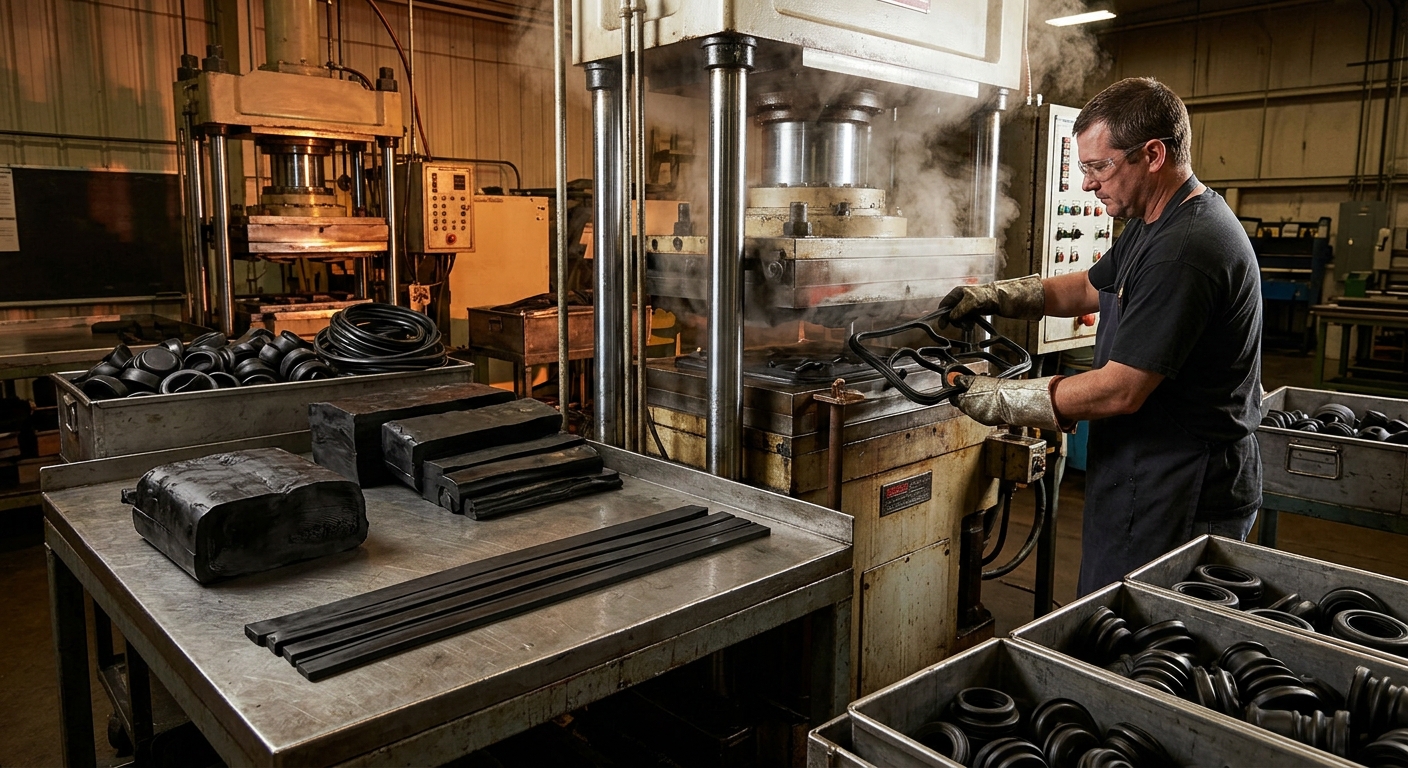
Rubber molding usually falls into a few main types. Compression molding uses heat and pressure to press rubber into a cavity. Transfer molding moves preheated rubber into the mold through a channel. Injection molding pushes rubber into the mold under high pressure and works well for complex parts and high volume. Liquid silicone rubber, or LSR, molding is a special form of injection molding for clean and precise silicone parts.
Compression Molding
I use compression molding when I want a simple process and a strong part. I place a pre-measured rubber charge into an open mold. Then I close the mold and apply heat and pressure. This method works well for larger parts and lower production volumes.
Transfer Molding
I use transfer molding when I need better detail than compression molding can give. The rubber sits in a chamber first. Then pressure moves it into the cavity. I like this method for parts with inserts or more complex shapes.
Injection Molding
I use injection molding when speed and repeatability matter most. The machine feeds rubber into a heated barrel. Then it injects the material into the mold cavity. This method supports high output and tight control.
LSR Molding
I use LSR molding for parts that need clean surfaces, fine detail, and stable performance. The process handles liquid silicone and cures it in the mold. I often see it used in medical, baby care, and sealed electronic parts.
| Process | Best For | Main Strength | Main Limitation |
|---|---|---|---|
| Compression | Large or simple parts | Lower tooling cost | Slower cycle time |
| Transfer | Detailed parts with inserts | Better flow control | More waste than injection |
| Injection | High-volume production | Fast and repeatable | Higher machine and mold cost |
| LSR | Clean and precise silicone parts | Great detail and stability | Material and setup cost |
Step-by-Step: How Does the Rubber Molding Process Work?
I always find it useful to break the process into clear steps. The full flow looks simple on paper, but each step matters. I have seen small mistakes at the start create scrap at the end.
1. I define the part needs
I first decide what the part must do. I look at shape, size, heat, wear, sealing, and chemical resistance. I also think about the final use, because a soft gasket and a car seal need different design choices.
2. I choose the rubber material
I then select a rubber type that fits the job. The material choice affects life, flexibility, and cost. I never treat this as a minor step. It changes the whole project.
3. I design the mold
I move next to mold design. I think about cavity shape, vents, gates, shrinkage, and release angle. I also plan for inserts if the part needs them. Good mold design saves time in every later step.
4. I prepare the raw material
I weigh or measure the rubber charge. I make sure the material is clean and ready. I have learned that poor preparation often causes uneven filling or weak spots.
5. I shape and cure the part
I place the material into the mold or inject it into the cavity. Then heat and pressure start the cure. The rubber changes from a soft mass into a stable part. This is the core of the process.
6. I remove and inspect the part
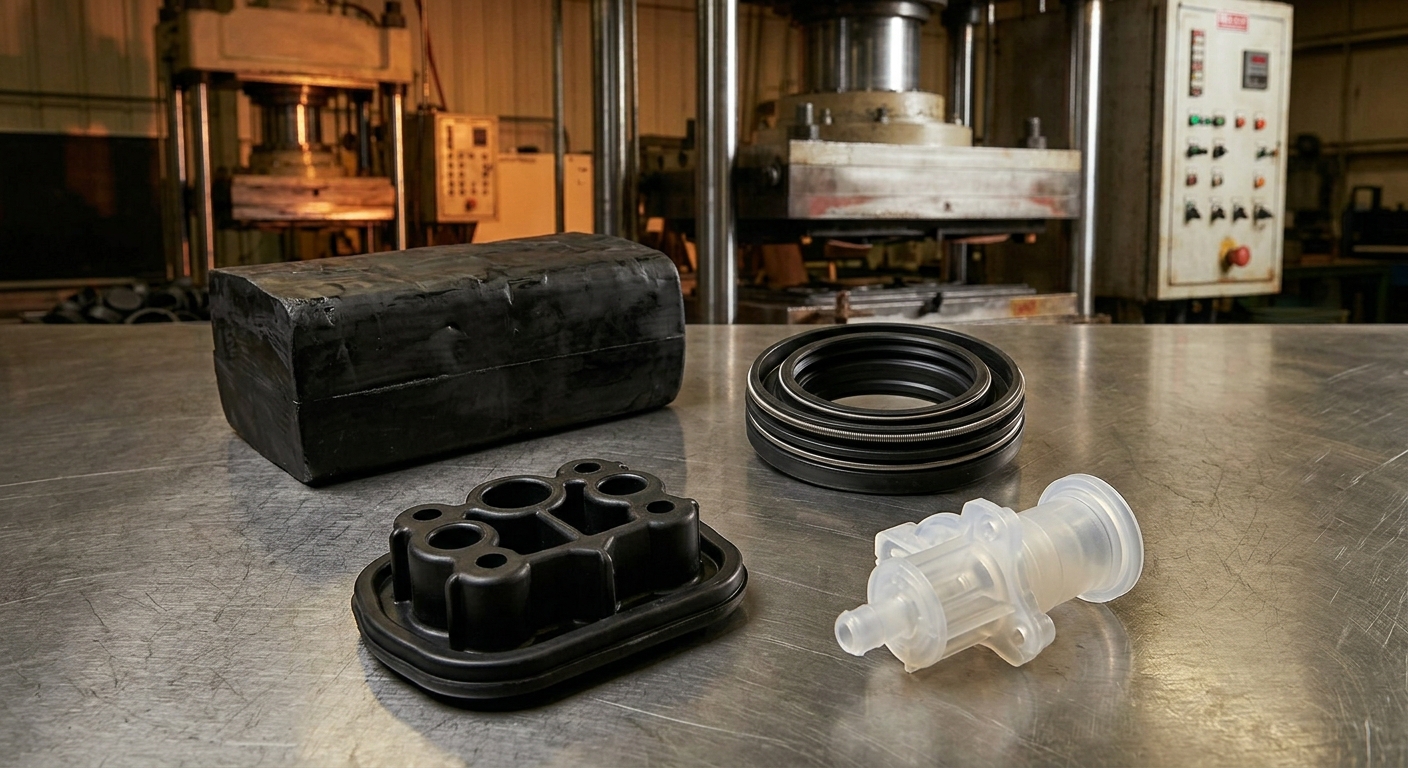
I open the mold and take out the part. I check shape, flash, surface finish, and size. If needed, I trim extra material. I also test the part against the design target.
7. I finish and use the part
I may add post-processing if the project needs it. Some parts need printing, bonding, or assembly. After that, the part is ready for use.
I often explain this flow with a simple table because it helps teams see the logic faster.
| Step | What I Do | Why It Matters |
|---|---|---|
| Define needs | Set the use and performance goal | Keeps the design focused |
| Choose material | Match rubber to the job | Controls strength and life |
| Design mold | Plan the cavity and flow path | Improves quality and reduces defects |
| Prepare material | Measure and clean the charge | Helps the part form evenly |
| Cure the part | Apply heat and pressure | Turns raw rubber into a stable part |
| Inspect | Check size and surface | Catches problems early |
| Finish | Trim or assemble if needed | Makes the part ready for use |
Common Materials Used in Rubber Molding
I never treat rubber as one single material. I see it as a family of options. Each one has its own balance of cost, heat resistance, sealing strength, and flexibility.
Natural Rubber
I use natural rubber when I need strong elasticity and good tear resistance. It works well in many basic industrial parts. It does not always handle heat or oil well, so I check the use case first.
EPDM
I like EPDM for weather, water, and ozone resistance. I often see it used in seals, hoses, and outdoor parts. It is a strong choice when sunlight and aging are a concern.
Nitrile Rubber
I choose nitrile when oil and fuel resistance matter. It is common in automotive and machine parts. I use it when the part must stay stable around grease or petroleum-based fluids.
Silicone Rubber
I use silicone when the part needs heat resistance, clean performance, or soft feel. It works well in medical and food-related uses. It also stays flexible across a wide temperature range.
Neoprene
I use neoprene when I need a balanced material with good weather and moderate oil resistance. It is useful in seals, pads, and protective parts.
Fluoroelastomer
I use fluoroelastomer for harsh chemical or high-heat environments. It costs more, but it gives strong performance where weaker rubbers fail.
| Material | Main Strength | Common Use |
|---|---|---|
| Natural Rubber | High elasticity | General industrial parts |
| EPDM | Weather and ozone resistance | Seals and outdoor parts |
| Nitrile | Oil and fuel resistance | Automotive components |
| Silicone | Heat resistance and clean use | Medical and food-grade parts |
| Neoprene | Balanced durability | Pads and seals |
| Fluoroelastomer | Chemical and heat resistance | High-demand industrial parts |
My insights
Rubber molding is one of the core processes in manufacturing that is seriously underestimated. It is not only cost-effective but also meets a large number of high-end demands ranging from medical devices to automotive parts in terms of precision and durability. Once you truly understand its principles, you’ll find its complexity far exceeds surface perceptions and is even stronger than many people imagine.
I agree with that view from my own work. I have seen rubber molding act like a quiet backbone in many products. A team may focus on the outer design, but the molded rubber part often decides if the product seals well, feels right, or lasts long. I also think good rubber molding is never only about the press or the machine. It is about the full chain from idea to material to mold to final check. When I design with that full chain in mind, I get fewer problems, better quality, and a smoother launch. That is why I respect this process so much. It looks simple at first, but it rewards careful thinking.
Conclusion
I see rubber molding as a practical process that joins material choice, mold design, and process control into one reliable path from concept to finished part.